Polar Cloud
Sites
Sites are used on the Polar Cloud to hold the licnese and hold the access to the various Polar Gateways and Devices for the Site that is being monitored. This article will take us through how to use and manage sites effectively to get the most out of the Polar Cloud.
Sites are the next step after creating an a group for your installation. If you have not created a Group yet please navigate to the how to GROUPS. Once a group is successfully setup then come back to this page to continue.
Site Understanding
Sites perform a number of key roles on the platfrom. These include the following:
- Managing and holding of the license
- Holding of Gateways
- Holding of Devices connected to said gateways
- Provides a user friendly experience when managing all the above points
- For Energy Management Systems (EMS) it also holds the configurations for the control aspects and Time Of Use (TOU Schdules.
- Provides management of time zones
Creating a new Site
To create a new site we start by navigating the sites page from the home screen or the left hand menu.
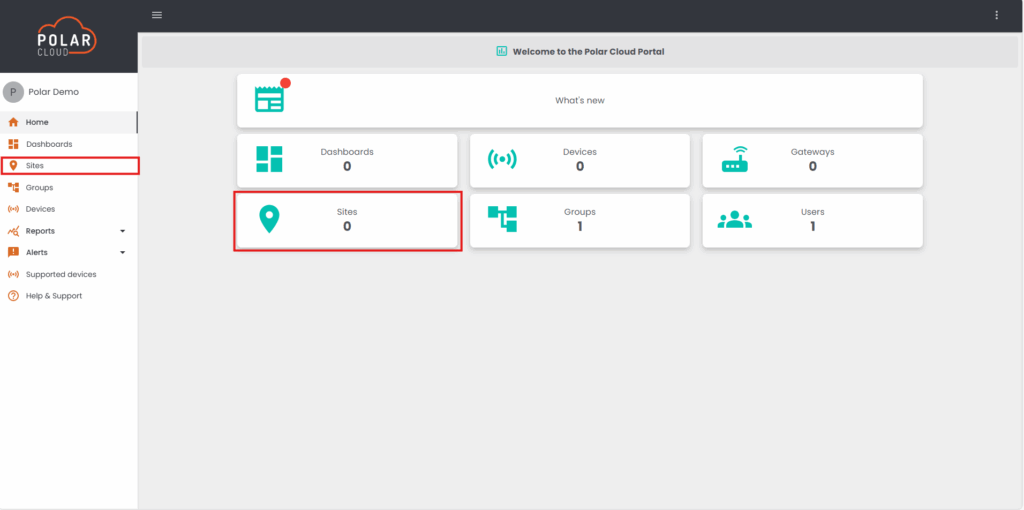
When landing here for the first time there will be no sites on your account. If you are already an active user this is where you can see all your existing sites on your account.
Adding the site
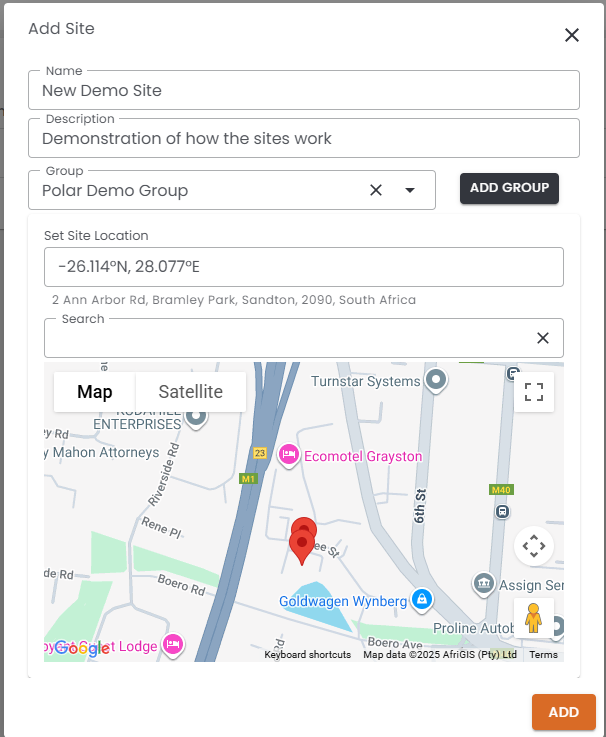
In this window you will see a view of sites you have access to, to add a new one click on the + Add site icon on the top right of the screen.

Once you have clicked on the add site a diaglog will appear on the screen to configure and setup a new site.
Note: If this is your first interaction on the Polar Cloud a dialog box will also appear in your browser asking for permission to acces your location. This is so we can quickly set the location of the site based on your current position. Choose allow to streamline the process.
Next on the window in the center add your new site name and a basic description of your site.
Select the Group you wish to connect your site to. As discussed above only groups that are already created will appear in the drop down list. If you have not added a group yet you can also click on the Add Group Button to create a new group as described in the Groups Section in the knowlege base.
Finally set the location of your site, this can be specific coordinates or a search for a street address.
The location will show below on the Map with a red pin drop Icon
Once set click the ADD Button on the bottom of the window to add your new site.
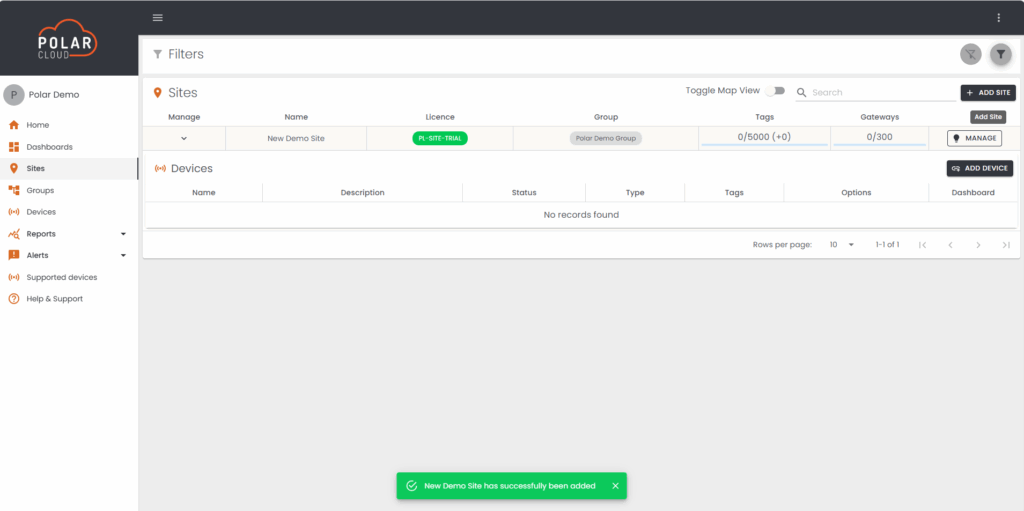
Now that the site is added it will navigate you back to the Sites page where you will see your new site.
The sites page Explination
Now that we have added a site one will notice there is quite a bit of information available to us. Starting from left to right we will go through all of them and what they mean.
Manage: This allows us to expand the view of the site to show us all the Gateways and Devices linked to this site.
Name: This shows us the name of our site
License: As mentioned above the site holds the Polar Cloud License. When creating a new site a 7-day trial license is automatically added to allow the next steps of adding gateways and devices to the site unrestricted to assist with calculating the ultimate license required for this site.
Hovering your curser over this will display how many days are left until the license expires
Clicking on this license will take users through the process of purchasing a new license for said site.
Group: This shows the Group that the Site is connected to
Tags: Shows the number of tags used vs the total number allowed on the license assigned, For more info about Tags, CLICK HERE
Gateways: Shows the number of Gateways assigned to this site vs how many the license supports.
Manage: Allows us to manage the sites settings and configurations.
Managing a site
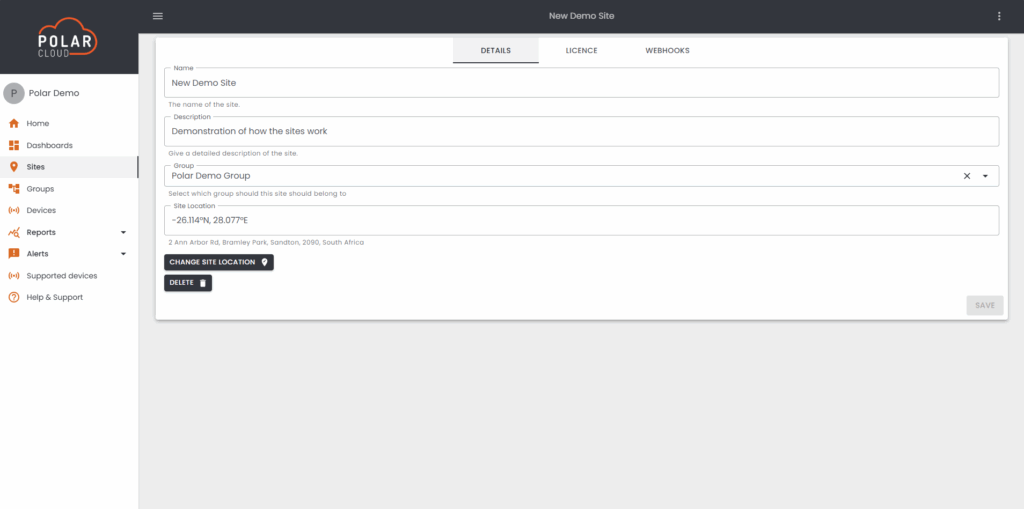
In order to manage a site that has been created we need to click on the Manage button next to the appropriate site.
What are we looking at
Landing on this page we have a variety of information and configurations we can do for a site.
The landing page offers us a change to edit site information like name, group allocation and location.
To see what site you are curretnly edditing simply look at the top of the page as it displays the sites name.
After anything is edited please make sure to save your changes at the bottom right of the window.
Top Menu’s
At the top of the page we will see 3 menu’s that perform different functions these are as follows:
Details: Details around the sites base configurations such as name, group allocation, description and location
License: The license allocation of the site. This shows the user what Devices and Gateways are allocated to the site and their appropriate license usage. This also show information regarding the license that is currently on the site.
Webhooks: This section allows one to add and manage webhooks ascociated with the site. For more information around the webhooks and how to configure them CLICK HERE
Delete
This delete button allows users to permanently delete a site. Note that Sites cannot be deleted until all Gateways and Devices have been removed from the site first.