Polar Cloud
Action Buttons
Action buttons are used to trigger outputs to devices in the field remotely from the Polar Cloud.
These buttons are located on the the device dashbaord. This can be accessed by navigating to the devices list > clicking on the appripriate devices dashboard.
This guide will be taking you through the various types of buttons and actions and how to edit them.
To get started click on the Pencil icon on the live Dashboard and pressing the Edit controls button.
Note: This edit function is only availbe to technician and manager role users of the Polar Cloud
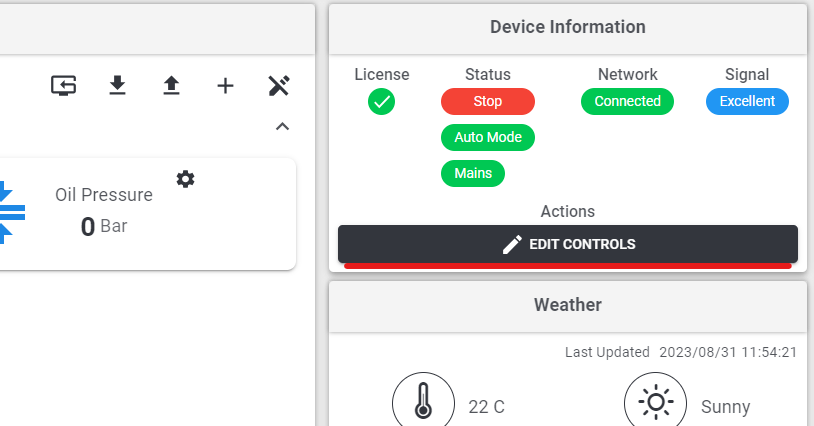
Once you have clicked on the edit control a popup window will appear on the screen of all the buttons currently available on the dashboard. Called Edit Device Controls
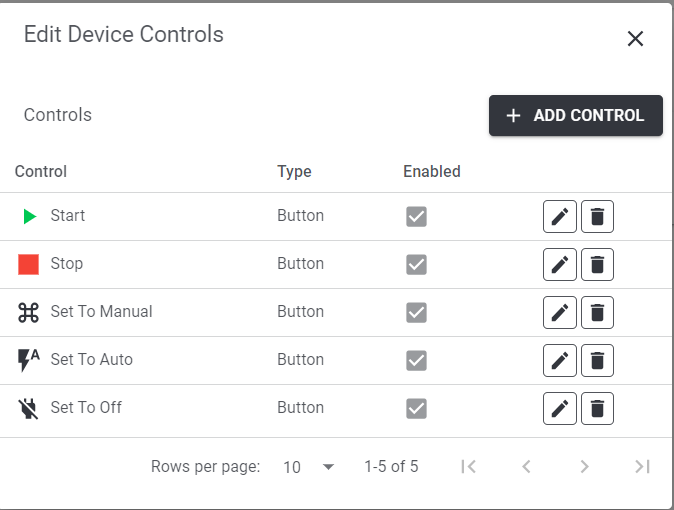
The control buttons are now listed here. The control buttons can now be editted with the pencil icon or deleted with the bin icon.
To Enable/ Disable control buttons, click the edit button next to the appropriate button and tick the enable/disable. Finally click save at the bottom of the page to save the configuration.
Adding a custom Button
This functionality is only available to the Technician user roles on the Polar Cloud.
Note: In order to effectively add a custom button to a device an in depth knowledge of the specific device and its modbus registers will be required.
This section will break down what each section means and how to add it successfully.
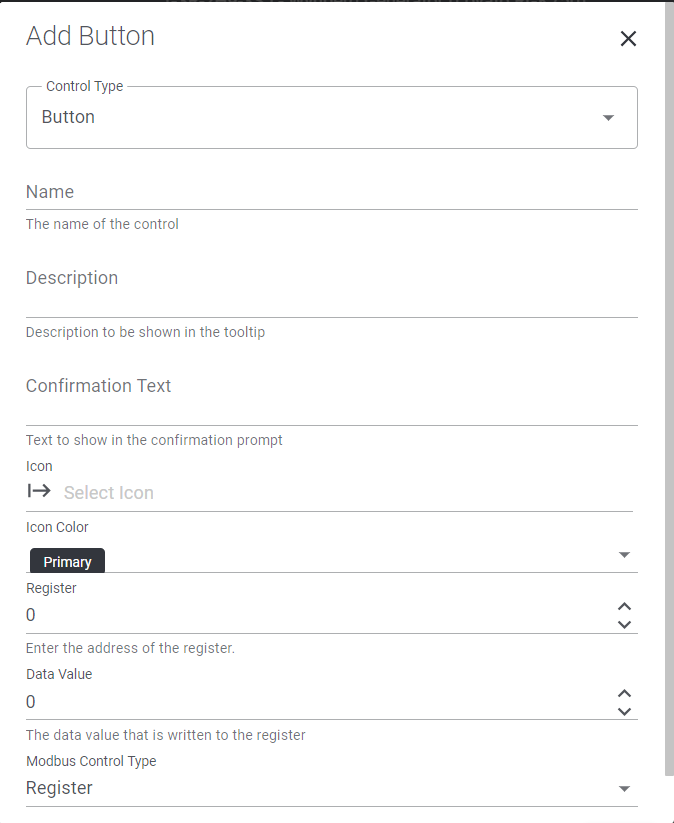
Control Type
The control type is to choose the type / style of button required. The platfrom has a number of button types in the drop down. They are explained as follows:
- Button – This is a standard push button type, click the button and it executes a single Modbus write command
- Toggle State – This is similar to the push button but will also read the current state from the device in the field to then switch its current state.
- Pulse MB4442 Output – This button type is purely reserved to Pulse the Polar Monitoring MB4442 Fieldbus module for a duration of time.
- Promt – This button type will throw a prompt up onto the screen
- Multple Commands – This button type will allow writing of multiple registers in one click, This is usable for some device types where multiple registers have to be written at the same time for the action to happen on the device.
Name
This is the name that will appear on the button on the on the Device Dashbaord
Description
This descirption will appear when you hover over the button with your curser
Confirmation Text
All buttons on the system have a confirmation that must take place to trigger, this text will then show when when confirming the “clicking of the button”
Icon & Colour
This is the icon for the button being created and then the colour drop down will let you select colours for that button
Register
This is the Modbus register that you are wanting to send a value to when pushing the button
Data Value
This is the value that should be writen to the register above when the button is pressed.
Modbus Control Type
This is where one can choose between writing to a coil or to a register.
Saving
once all these settings are filled in click Add on the bottom right to add the button to the list.